
Friday, February 1, 2008
Good Old Perculators
So my best friend has a beach house that is awesome. It is on an island, less than a mile from the mainland, but an island still. It is so peaceful there. After taking a small boat over to it, it is total relaxation after you arrive. There is NO ELECTRICITY on the island and you can only run a generator for 2 hours a day. It is a great place to stamp, during the day anyway, a little tough at night. I ALWAYS bring a bag of stampin goodies when I visit. At any rate, I digress. We always make fresh coffee in a coffee press, but we heat the water up in an old stainless steel perculator on the top of a propane oven. When I saw the Coffee and Tea set from Crafty Secrets, I immediately thought of my very relaxing and enjoyable weekends. After I bought it, I really wanted the coffee perculator to be silver, like the stainless steel one, I had some silver paper and that worked good too, but then I found this silver tape in the hardware section at WalMart. It is used to tape the dryer vent. I stamped in in Stazon black, colored the cheeks with a sharpie, I didn't have my copics yet. The arm, because it is sooooo teeensy I dreaded cutting it. I did cut some. Then I had a lightbulb go off. I colored the arm section on the metal with my white signo gel pen then colored it skin tone after it dried. I like it like that!!!!!! So, here is my card and thanks for looking.


Thursday, January 31, 2008
Crafty Secret

When you are making cards does this ever happen to you? Do you not want to stamp the sentiment on the card if you don't know EXACTLY who the card is for? I do. I don't want to stamp something , then not have it appropriate and have to tear the card apart, then put it back together. So, sometimes I'll stamp/design for the colors/patterns/feeling. Then when I need the card, I quickly look for a suitable sentiment. Something great about the clear stamps, like MFT Sassy Sayings, or others from PaperTrey, I can stamp them however I need them. This is one of the ladies from Crafty Secrets Coffee and Tea set. Love that set, it's awesome. Thanks for looking.
Wednesday, January 30, 2008
Cuttlebug one last time
Here's my last CB for a while. I get into a routine and then I keep doing them in different colors, folders, etc. Tomorrw I'll switch to something new. Here's the last one.
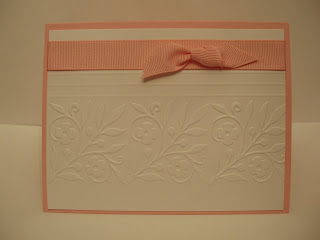
I would never, never had bought the fancy corner embossing if it hadn't been for seeing NoTimeToStamps beautiful cards. Now I'm in love with them. I have so many of the A2 folders, but the corners and smaller ones, I bought fairly recently. Now one of the girls at work has asked me to borrow this actual folder, because she saw the card I made like this and gave it to someone else I work with and she had it on her desk. Pretty in Pink cardstock and GP white cardstock. Thanks for looking.
Tuesday, January 29, 2008
Valentines Again
Ok, ok I know, Valentines again. Hey what can I say, I needed to get some done. I usually send out a bunch with the girls photo in it to family members. These I used my Cuttlebug-- ala No time to Stamp style, I added some stamping, which, eek I was nervous. I love the clean, crisp, monochromatic look, but had to take the chance. Here are a few:

These used the script folder for the Cuttlebug. I ran a 8in by 5 1/4 inch through the CB with the folder in the middle. Then I cut those at 4 inches and used the Scor-Pal with 2 lines. I had this ribbon and the generic blue/violet cardstock. The reason I made these, and the next few is because I re-organized my ribbon, well some of it onto the round tab punch and this color just was so fat on the spool. I said to myself "self, you need to use some of this ribbon immediately". Thanks for looking. The ink is from Ancient Page and is on a wheel that I got at Joanns, I think the color is pink pizzaz, the stamp is from an retired SU, year round cheer, either I or II. Thanks for looking
Valentine Cards
Remember my "using what I have", well I sort of did. The cardstock, the paper, the stamp were things I had. I used pretty in pink cardstock, this yummy paisley that is in a winter slab from DCWV, but I love it. I colored my "Loads of Love" truck with my copics and a siver ball point pen that I have. Now there is "something new" in this


See the row of bling. These were clear. I got them in the $1 spot at Michaels, they are part of a rectangle that is supposed to go on a cell phone. The sticky on there is soooooo strong. I colored them with the same copic I used to color the truck. I love them. They are already straight. This is something I am challenged with--- straight. Even with the Mat Pack. Oh well, util next time... Thanks for looking....
Tuesday, January 22, 2008
Copic Baubles
I found these clear baubles in the floral section of Michaels. I had seen a bag of them on Joanna's Creative Expressions blog. Hers were pink/purple variety and very pretty. When I was there I saw they had clear ones too. Since I've been coloring anything that doesn't move with my copics, I figured I'd give it the ol' college try. I colored some in my last posts trying to compliment the colors in my cards. I liked the way the browns came out, but the green was not the correct tone. So I got to thinking about my ink color chart that I made with all my ink pads. I decided to make one with the baubles since there are 5 ounces of them, which probably equates to like 1000 baubles. Heres what I came up with:

So now I'm thinking I can look at this and know which Copic or Bic Mark It I can use to get the color I 'm looking for. I was surprised how light some of my copics were on the baubles. I only have 48 of the copics, but as I get more I could add to the bottom of this chart. This is the back of a cardboard box I had. I just dotted the cardboard with glue, put the baubles on top, wrote with a pen below what color they were and then colored the bauble. I actually thought (started) about writing the name of the marker in it actual marker below the bauble, but decided to try to save my aging eyes by writing it in black ink with a ballpoint pen.
There were colored baubles there too, which if I do plan to get some when I go back, I figure I'll bring my cardstock chart with me and grab the ones I think will work best. I just didn't trust my memory that day. Thanks for looking. Have a great day.
There were colored baubles there too, which if I do plan to get some when I go back, I figure I'll bring my cardstock chart with me and grab the ones I think will work best. I just didn't trust my memory that day. Thanks for looking. Have a great day.
Monday, January 21, 2008
MMM MMM Monogram
So, I have this awesome friend, Lynn. We've been friends for over 30 yrs--yikes, I am getting old. Ever since she moved to our school in 4th grade. I remember it like it was yesterday, and I am so thankful that God brought us together. She's been there for me during some really important, both good and bad, times in my life and I hope to be as good a friend to her as she has been to me. Anyway, I feel like something that great and that old deserves to be documented, in a blog, in a scrapbook, in a journal-- basically anywhere and everywhere. Well she had a Silpada jewelry party last Friday. I wanted to give her something when I arrived. She always comes to my house laden with goodies, mostly snacks and drinkies. (Like I said we've been friends forever she knows..!!!!!) So I made these cards below:

I also stamped the envelopes with her initial too. (Sorry didn't photo those) She really liked them ,which was great. I used a SU set classic labels I think it's called, the letter is Brenda Walton, and my Nestibilities for the scalloped squares, some of them I actually layered one over another. The patterned paper and the colored cardstock are Martha Stewart, the white is Papertrey, the ink is classic black from SU. Black cardstock is unknown. Thanks for looking and see ya soon.
Subscribe to:
Posts (Atom)


 Posts
Posts

